Hello there!!
I’ve had several requests for information on my resin pour process. I figured I’d recap what I’ve done in one post instead of the blurbs in each post.
Disclaimer: I am no resin expert. This has all been a labor of love and trial and error. There have been several failures, and a lot of learning.
When I started them, I started making notes. I would definitely recommend doing several things.
1. RTFM. Seriously. Read the information that comes with the resin. Then go look at anything they tell you to look at.
2. Read more information. Go to Reddit. Read about resin jewelry making, read about how to pour it on a bar. Get to where you know what you’re doing before you do it.
3. Get silicone molds. If you can’t find what you want in one section, look for baking molds. The mold I ended up using is a candle mold. They’re made to hold the heat, use them.
4. Get a workstation for just resin. Get graduated cups, stirring sticks, and a level pouring surface. I got a plastic tray from hobby lobby. You will drip, and you don’t want to do it on your countertops.
5. Get a wand lighter and some way to shake the mold. I put my tray on my dryer and run it on the low setting. It vibrates bubbles up and then you can pop them with your lighter.
6. Seal your stuff. If you’re putting something underneath the resin, it needs to be sealed with PVA to reduce bubbles. Paepercuts recommends 2 coats of watered down PVA mixed with a tiny bit of dish soap. This makes it so that the resin doesn’t soak into the stuff you have down there. On the resin, it recommends the same thing, but with very thin coats of actual resin. Haven’t tried that yet, can’t recommend one way or another.
7. Don’t get crazy when you’re mixing. If you mix it too vigorously, you introduce bubbles. Mix in one cup until it looks clear (it will lose it’s streaky appearance), then pour into a second cup and mix it again. This is the point where you can add coloring.
8. Coloring: Juan Barrena suggests using paint that you haven’t mixed. You know how its thin with very little pigment if you pour your paint without mixing? Like unshaken ketchup? That stuff. The only problem I saw with that is if you’re doing multiple layers. The color would be very difficult to match that way.
9. Coloring 2: Practice your coloring. Pour a batch and see what color it ends up as. That was important for me, because I made one waay too dark.
10.Practice! I’m on my second box of resin because I’ve done like 6 practice pours at this point.
11. Don’t use IPA to pop bubbles. It makes a weird scum on top. The instructions say it can help pop bubbles, but I didn’t have success with that at all.
I didn’t really notice a difference between the envirotex lite or the other equally priced resin from hobby lobby. YMMV, just test it out. I would plan to buy at least 2 boxes. You really don’t want to paint something and then pour resin and ruin it.
Here’s my collected works!
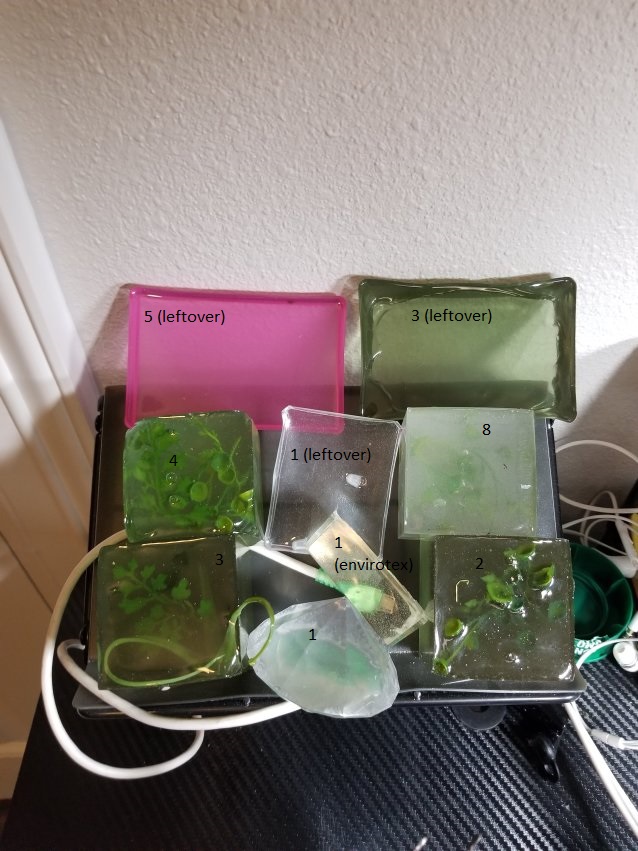
I had intended to take pictures of each one next to its entry, but I forgot. Baby, blah blah blah.
So, here’s my results, some notes, and the pictures are labeled to help. 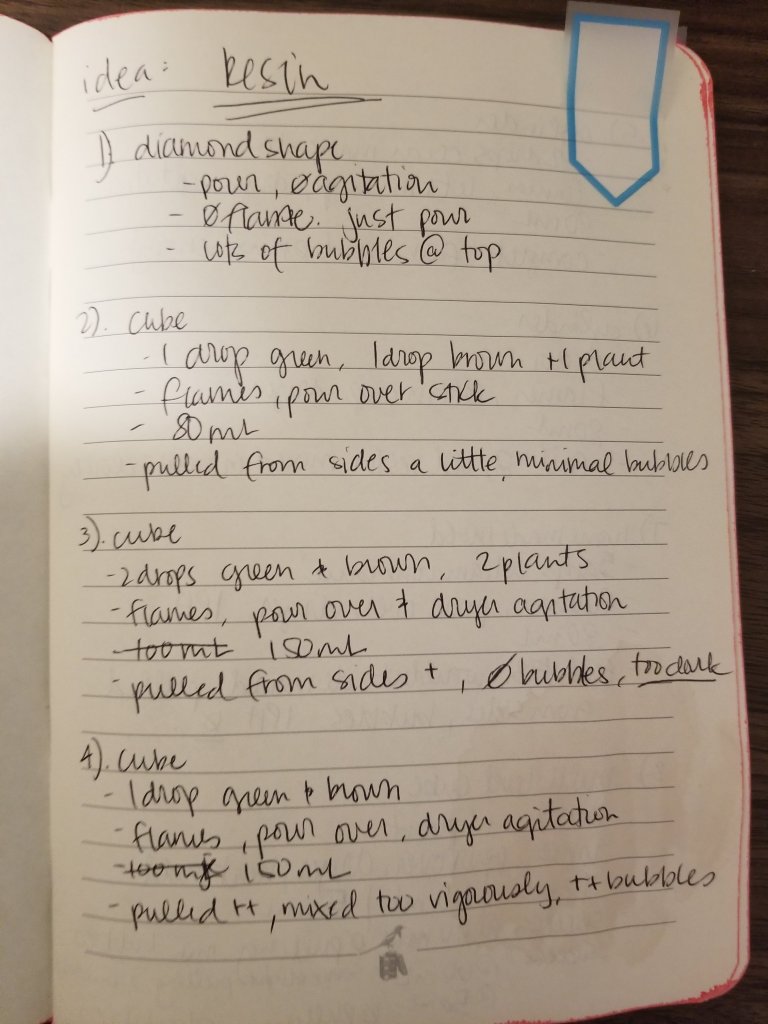
- The first pour I did was in the diamond shaped mold. I used the hobby lobby $23 resin. I poured it over a spoon, and had no agitation. I didn’t use the flames or anything, just poured it gently and hoped for the best. I wanted my first attempt to be just exactly whatever it would be. The end result was that many, many bubbles got stuck underneath the mold.
- The second one I (accidentally) used the technique of not shaking the bottles. I used the cube silicone mold from amazon, and popped bubbles with a wand lighter. I also poured it over the stick. The results of this were that it pulled from the sides a little, but it had minimal bubbles.
- This time I put in more color, but I shook the bottles, so it was too dark. I poured over a spoon, used the lighter and dryer. This one pulled from the sides, I think because it got too hot. It was a higher volume, so it gets hotter. I didn’t have many bubbles though, so that was a win!
- I went back on the color this time, but I shook them again. I did the exact same thing as last time, except I accidentally mixed it vigorously, so there were tons of bubbles. And because there were so many bubbles, it pulled from the corners a LOT.
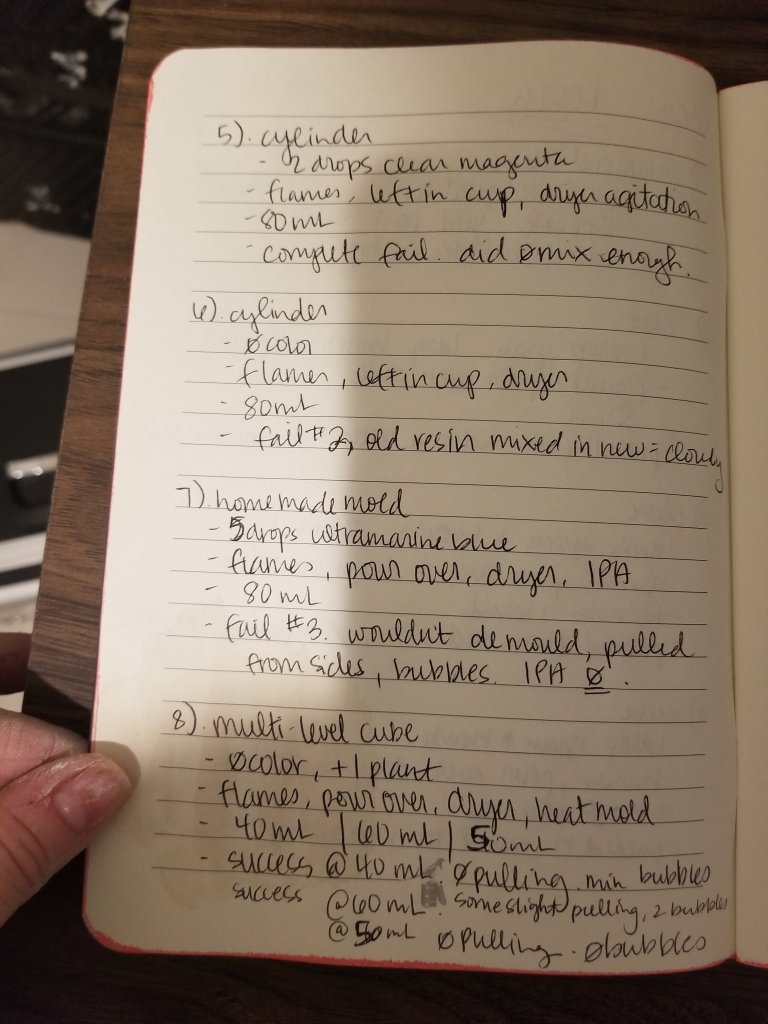
- Fail 1 of 3. I tried to use my mixing cup as the mold, which means I didn’t pour it or mix it enough. It didn’t set and made a big mess. Clear magenta worked really, really well though. Definitely recommend them for tinting.
- Fail #2. Since my mix didn’t set previously, and it was in my mixing cup, I decided to try and add new resin to the old to see if it would set. It didn’t.
- Fail #3. I tried making my own mold out of plasticard and hot glue. It is hard to make a box. Lol. I didn’t put a release agent on it, so it molded to the box, the IPA made a weird scum on top, and it pulled from the sides. Just bleh.
- I decided to try multi level pours. I was tired of the large volumes pulling from the side. It worked! I did 3 layers, 40,60, and 50 mL volumes. There were some difficulties, next time I won’t wait for it to be fully cured before I pour. If I wait for it to start reacting, I can pour the next layer and it should be okay. I used my normal set up of the pour over, dryer, and flames technique.
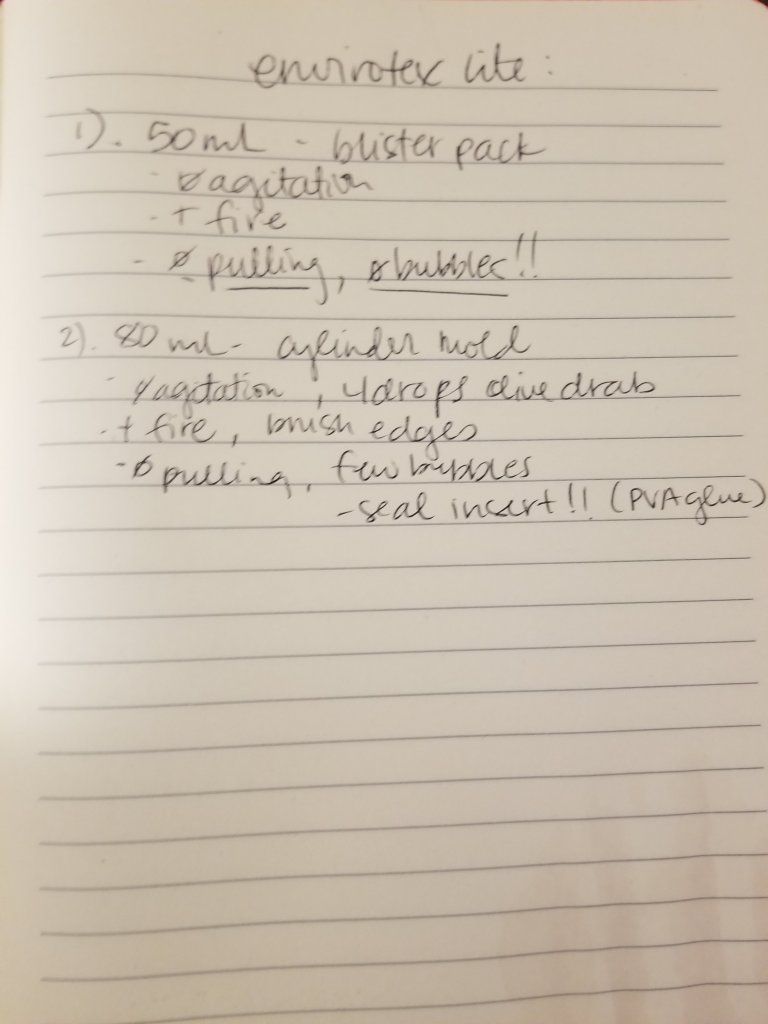
- (or 1) This was my first time with envirotex lite. I just poured into a blister to see how it would go. It went just fine, 50mL didn’t pull, and I didn’t use the dryer. I didn’t have any pulling or bubbles. Very happy. It’s a little more yellow and less clear than the other brand. Since I’m planning on tinting it, it doesn’t matter to me. Just FYI.
- (2) I tried one with a bunch of stuff in the bottom, and I didn’t seal it. That gave me bubbles. Otherwise, it worked well. I did have an error on my part in that I didn’t make sure it was level. Since I put it in the mold unevenly, the top was strangely uneven.
Alright. So, steps I have taken to get to perfection. I built a spacer out of air dry clay inside my mold to make sure the base is level. I could have just put it all the way at the bottom, but i was concerned about dripping resin, and ability to pop bubbles all the way down there. If this doesn’t work, I may just cut it down to size! We’ll see.
I’m also going to seal my next attempt to have a filling to make sure that it doesn’t bubble. I didn’t spend all this time on painting and making a swamp base to have it ruined with bubbles. Since the resin is the actual technical piece of this, I don’t imagine there will be much leeway for mistakes on it.
One last piece of advice, stay with your resin until it’s done reacting. Several times I thought everything was good and reacting, and I came back to big bubbles at the top. If it says it takes 20-40 minutes to cure, stay there. I found the best results when I sat in the room and played on the forums and checked on it every 5-10 minutes.
I’m happy to answer any questions.. and I’ll keep updating as I have more information!
-marinealRose
